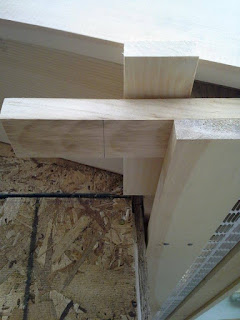
Week 18, I did a little work in and outside of the shed. Here I've put collar ties in place. These boards prevent the walls from spreading, which they are inclined to do, due to the downward/outward force of the rafters. You can see the angled cut, allowing the board to flush up with the outside edge of the top plate (framing).
The collar ties are spread 4 feet apart. Because the shed is only 12 feet long, only two collar ties are needed.
In this picture I've moved onto putting the drip edge back in place. Before taking it off (it was previously fitted in place), I numbered each part in the order it would be reassembled. Some work did need to be done to get the pieces fitted well together.
Here I am cutting shingles and starting the first course. Using a piece of plywood and a straightedge, I cut the first course of shingles (which are 3-tabs), removing the tabs. These were placed along the entirety of the first course, and then we placed architectural shingles over the starter course, flushing the architectural starter course with the 3-tab starter course.
Nailing the shingles in place, we were careful to offset our second course of shingles by 10", the third by 20", and the fourth by 30". This ensures that our nailing schedule never comes into conflict with any other nails. All nailing is 1" in from both sides, and then a third of a full course length in from each end, another nail is driven along the nailing line. (Each shingle tab has a visible chalk line, for nailing.)
Here I have five courses of shingles up.
Every couple of courses, we like to snap a chalk line. This ensures that we are still running courses that are true, not skewed, or running off course.
Here we are putting the ridge vent in place. First we snapped chalk lines, half the width of the ridge vent, down from the peak of the drip edge (where it meets at the ridge.), on both sides. This allows us to line up the ridge vent, along it's entire run.
And here we are nailing the vent in place, with galvanized nails.


